Think about the last time you tried to unplug your PS5 or Xbox Series X. Was it a battle? Did you pull the wrong cord and lose your internet connection? Or worse - did you yank a power cable and almost knock over your whole setup? If you nodded along, you’re not alone. Most gamers don’t realize how much chaos is hiding behind their TV. And that chaos isn’t just ugly - it’s dangerous.
Modern gaming setups aren’t just a console and a controller anymore. You’ve got a streaming box, a soundbar, a network switch, a PC for mods, multiple HDMI cables, USB hubs, charging docks for controllers, maybe even a mic and webcam. All of them need power. All of them need to talk to each other. And if you don’t organize them? You end up with a nest of wires that looks like a spider’s nightmare.
Why Cable Management Matters More Than You Think
It’s not just about looks. Poor cable management can cause real problems. Overloaded power strips? That’s a fire risk. Cables stretched across the floor? That’s a tripping hazard. Unlabeled wires? That’s a nightmare when you need to replace your router or upgrade your GPU. And let’s not forget: when you finally get that perfect shot of your gaming room for social media, you don’t want a tangle of black cords ruining the vibe.
Real gamers - the ones who stream, compete, or just love their space - know that clean wiring means better performance. Less interference. Fewer disconnects. Easier repairs. And honestly? It just feels better to walk into a room where everything has its place.
The Five-Step Method That Actually Works
There’s a reason pros and YouTubers keep repeating this: a simple five-step system beats fancy gadgets every time. Here’s how to do it right.
- Map your power needs first. Don’t just plug everything into one strip. Check the wattage of each device. A PS5 draws about 200W. A high-end PC? 450W+. A soundbar? Maybe 50W. Add them up. If you’re over 80% of your power strip’s limit (usually 1500W), you’re risking overheating. Use wall outlets directly where possible. If you need an extension, pick one with surge protection and a built-in breaker.
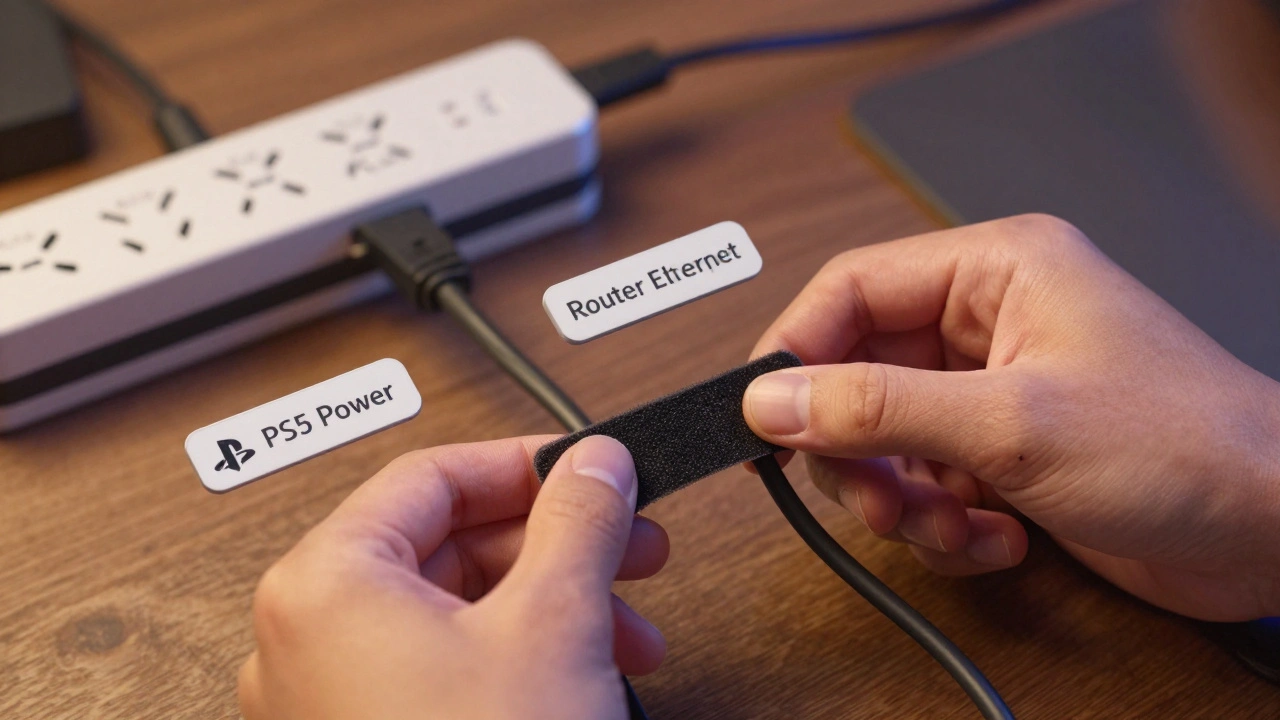
- Buy the right tools - not the flashiest ones. Skip the fancy $30 cable boxes. You don’t need them. What you do need: Velcro straps (not zip ties), adhesive cable clips, a label maker (or masking tape and a Sharpie), and maybe a plastic conduit if you’re running cables along baseboards. Velcro lets you adjust, remove, or add cables later. Zip ties? They’re permanent. And when you upgrade your console next year? You’ll hate yourself for using them.
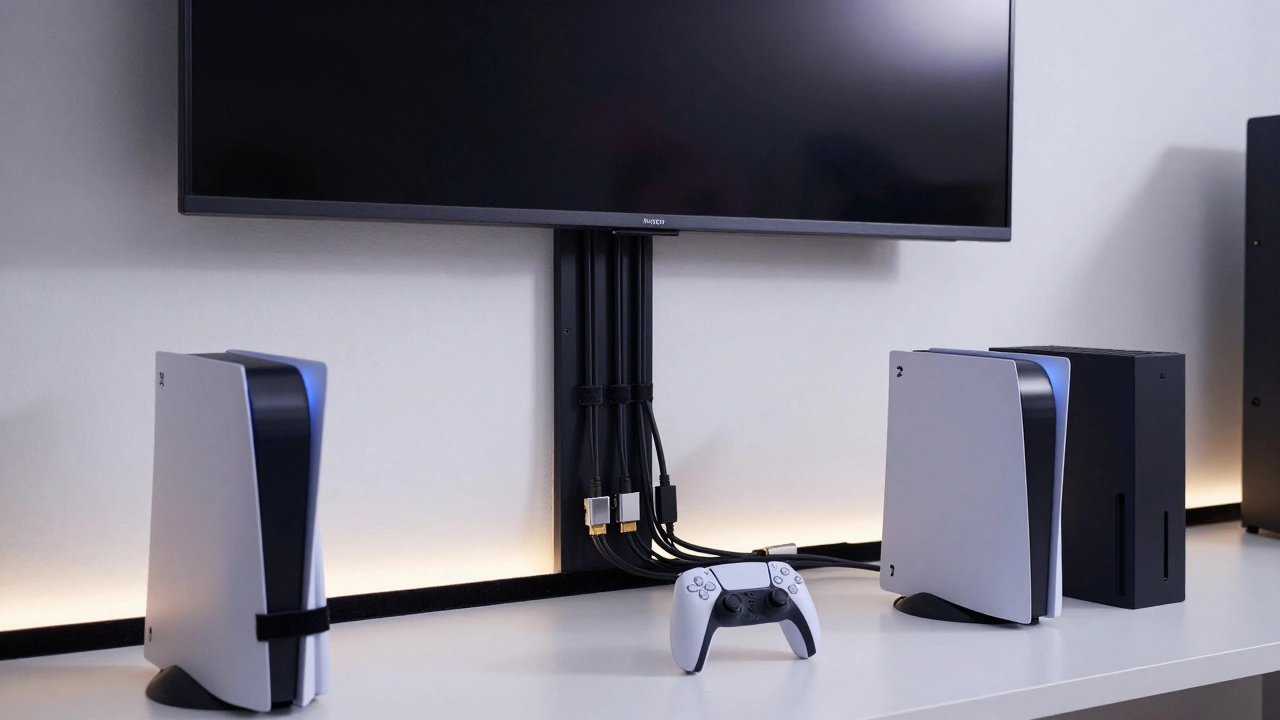
- Plan your zones. Divide your setup into sections. Left side? That’s your console, controller charger, and streaming device. Right side? Your PC, monitor, and mic. Each zone gets its own power strip. Route cables from each device to its zone’s strip. No crossing. No looping. No spaghetti. Label each power strip: "Console Side," "PC Side," "Audio Zone." It sounds silly - until you’re trying to find which cable controls your TV and you’ve got ten black cords tangled together.
- Route, secure, hide. Run cables behind the TV stand, under the desk, or along the skirting board. Use adhesive clips every 10-15 cm to hold them in place. For cables that run across the floor, use low-profile rubber strips or carpet tape to keep them flat and safe. If you’ve got a wall-mounted TV, mount a cable trunking panel behind it. It’s like a hidden tunnel for wires. Paint it to match your wall if you’re fancy.
- Label everything. This is non-negotiable. Write "PS5 Power," "Xbox HDMI," "Soundbar USB," "Router Ethernet" on each cable. Do it now. Don’t wait until you’re confused later. You’ll thank yourself when you’re swapping out a broken HDMI cable at 2 a.m. and don’t have to unplug three things to find the right one.
Pro Tips That Make a Real Difference
Here’s what separates a good setup from a great one.
- Use monitor arms with built-in cable routing. If you’re running dual monitors, get one with a channel underneath. Cables slide right in. No more dangling wires behind your screen. Brands like VIVO and Ergotron make these - and they’re not expensive.
- Don’t forget the back of your console. Consoles like the PS5 and Xbox Series X have ports on the back. If your setup is tight, you’re probably bending cables at sharp angles. That stresses the connectors. Use right-angle HDMI adapters or short, flexible cables to reduce strain. You’ll extend the life of your ports.
- Leave room for upgrades. Your next console might have USB-C, Wi-Fi 7, or a new video standard. Don’t pack your trunking or conduit to the brim. Leave 20% extra space. That way, when you add a new device, you don’t have to rip everything apart.
- Use wireless where you can. Controllers, headsets, and keyboards can be Bluetooth or 2.4GHz wireless. That cuts down on cables. But don’t go wireless for power. That’s a trap. Always plug power into the wall.
- Keep a spare cable kit. Buy one extra HDMI, one extra USB-C, and one extra Ethernet cable. Store them with your labels and tools. When one breaks? You don’t have to order it. You just grab it.
What Not to Do
Some "solutions" make things worse.
- Don’t use zip ties. They’re for construction sites, not gaming rooms. They cut into cables over time. They’re hard to remove. And if you ever need to change something? You’ll need scissors. And maybe a knife. And then you’ll cut the wrong wire.
- Don’t daisy-chain power strips. Plugging one strip into another? That’s how fires start. Even if the strips say "surge protected," you’re overloading the circuit. Use one strong strip. Or better yet - plug directly into wall outlets.
- Don’t hide cables under rugs. That’s a tripping hazard and can damage insulation. If you must run a cable under carpet, use a low-profile rubber strip designed for flooring. And never run it under heavy furniture - pressure crushes wires.
- Don’t ignore heat. Consoles and power strips need airflow. Don’t cram them into closed cabinets unless they have vents. Overheating kills electronics faster than anything else.
Future-Proofing Your Setup
The truth? You’ll upgrade. Maybe next year. Maybe in two. The PS6 or a new Xbox will come. Your PC will need a new GPU. Your monitor might switch to HDMI 2.1. Your cable management system has to survive that.
That’s why flexibility matters more than perfection. Use removable Velcro. Leave gaps in your trunking. Label everything. Keep extra space. Avoid permanent glue or drilling unless you’re sure.
One gamer in Portland told me he built his whole room around a single wall-mounted trunking system. He painted it black to match his walls. Every cable runs through it. When he upgraded from PS4 to PS5, he just unplugged the old cable, slid in the new one, and plugged it back in. Took five minutes. No mess. No stress.
Final Thought: It’s Not About Perfection. It’s About Control.
You don’t need a $500 cable management kit. You don’t need to turn your gaming room into a data center. You just need to stop letting cables rule you. Once you organize them, you gain something bigger than a clean room - you gain peace of mind. You know where everything is. You can fix it fast. You can show it off. And when the next big console drops? You’re ready.
What’s the best material for securing gaming cables?
Velcro straps are the best. They’re reusable, don’t damage cables, and let you rearrange your setup easily. Avoid zip ties - they’re permanent and can crush wires over time. For mounting, use adhesive cable clips or low-profile trunking attached to desks or walls.
Can I plug my gaming console and PC into the same power strip?
Yes - but only if the total power draw doesn’t exceed 80% of the strip’s rating. A PS5 uses about 200W, a gaming PC can use 450W+, and a soundbar adds another 50W. That’s over 700W. Most strips are rated for 1500W, so it’s usually safe. But never daisy-chain strips. Plug directly into wall outlets if possible.
How do I label cables without buying a label maker?
Use masking tape and a permanent marker. Wrap a small piece around each cable near the connector. Write "PS5 HDMI," "Xbox Power," "Router Ethernet," etc. It’s cheap, effective, and you can replace it when you upgrade. Avoid writing directly on the cable - the ink fades.
Should I run cables under the carpet?
Only if you use a flat, rubber cable runner designed for flooring. Regular cables under carpet can fray, become a tripping hazard, or overheat. If you must, secure them every 10 cm with low-profile clips and avoid placing heavy furniture on top.
What’s the easiest way to manage cables behind a wall-mounted TV?
Install a wall-mounted cable trunking panel behind the TV. It’s a shallow channel that hides all your HDMI, power, and Ethernet cables. Run them through it, then mount the TV over it. Paint the trunking to match your wall for a seamless look. No drilling needed - use heavy-duty adhesive strips if you’re renting.