Your favorite handheld console has a wobbly top screen. Maybe the right hinge is cracked, or the plastic casing has yellowed from years of sunlight. It’s a heartbreaking sight for any retro gamer. The good news? You don’t need to toss it in the trash. Replacing the broken hinges and shells on your Nintendo DS family system is a manageable project that can bring your device back to life.
This guide covers everything you need to know about fixing the original Nintendo DS, the popular DS Lite, and the DSi models. We’ll walk through the tools you need, the specific steps for disassembly, how to avoid tearing delicate ribbon cables, and whether you should do it yourself or pay a pro.
Quick Summary: Key Takeaways
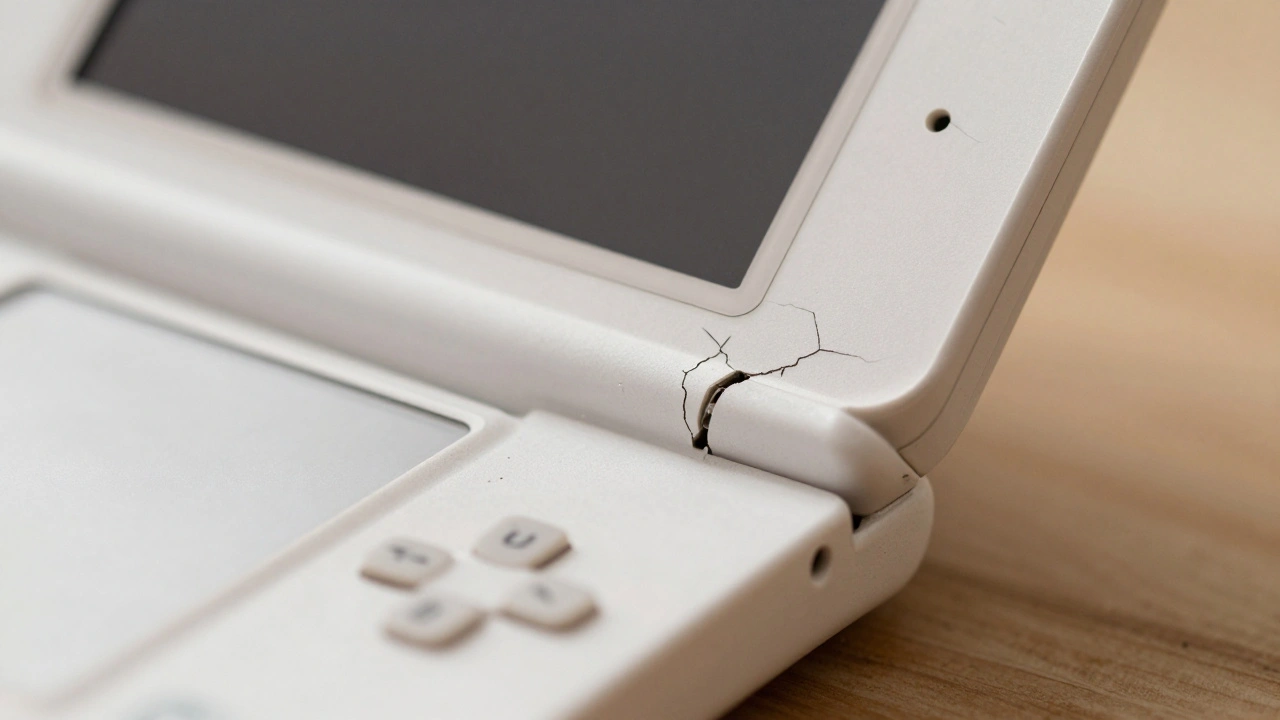
- DS Lite hinge repairs are common because the plastic near the power LED is prone to cracking after thousands of open/close cycles.
- You will need a Tri-wing Y0 screwdriver, which is specific to Nintendo handhelds, along with standard Phillips #00 and #000 drivers.
- The most dangerous part of the process is threading the upper screen ribbon cable through the new hinge barrel; forcing it causes permanent damage.
- DIY costs range from $15-$45 for parts and tools, while professional services charge $35-$60 per unit.
- Always test all buttons, screens, and Wi-Fi before snapping the final screws into place.
Why Do Nintendo DS Hinges Break?
To fix the problem, it helps to understand why it happens. The Nintendo DS family was designed by Nintendo Co., Ltd. and launched between 2004 and 2009. While durable in many ways, the hinge mechanism faces constant stress. Every time you open and close the clamshell, the plastic bearings inside the hinge rotate against metal pins.
The Nintendo DS Lite, released in 2006, is the most notorious for this issue. Early production units had a design flaw where the plastic around the right hinge (near the power indicator light) was too thin. After just a few months of daily use-roughly 5,000 to 20,000 opening cycles-the plastic develops stress cracks. These cracks start small but quickly propagate, causing the top screen to flop loosely. If left unfixed, this loose movement can snap the delicate ribbon cables that carry video signals to the upper LCD, killing the display entirely.
The original "Phat" DS and the later Nintendo DSi and DSi XL have different hinge geometries. They are generally more robust but still suffer from wear over two decades of use. Shell replacement isn't just about fixing mechanics; it’s also a chance to remove yellowing discoloration caused by UV exposure and oxidation.
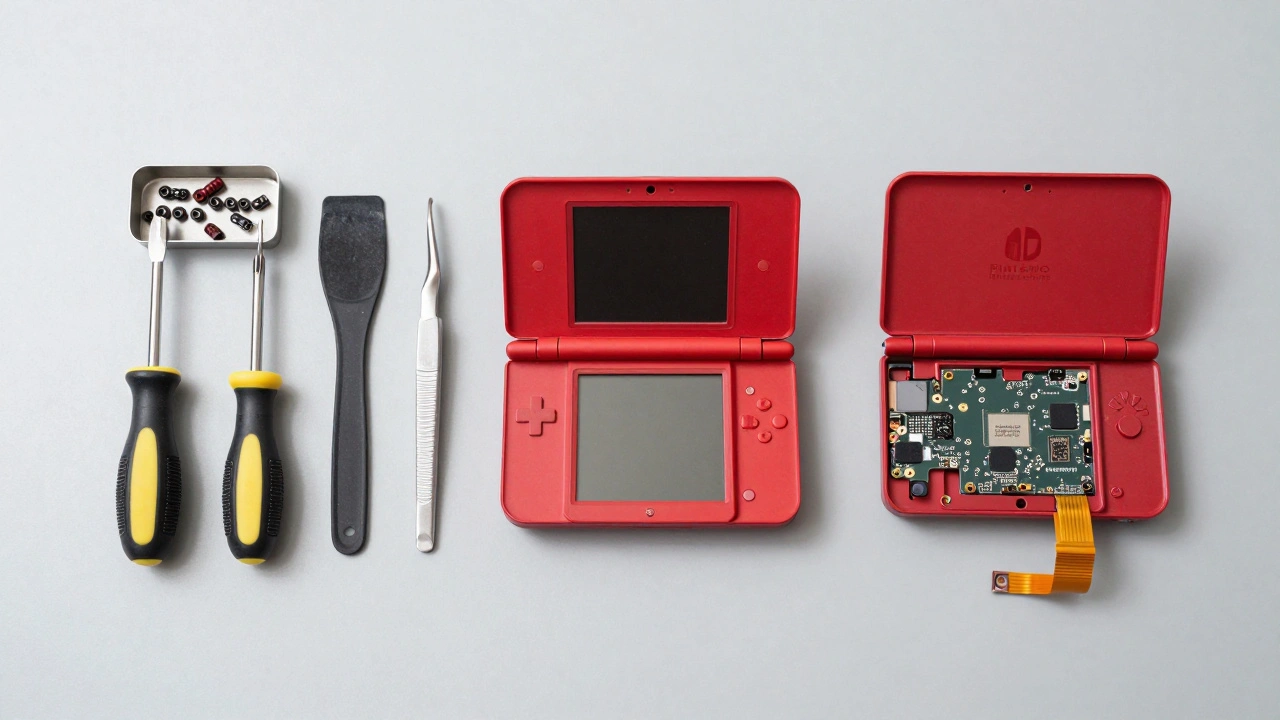
Tools and Parts You Will Need
You can’t open a Nintendo DS with a standard household screwdriver set. Using the wrong tool will strip the screws, making reassembly nearly impossible. Here is your shopping list:
- Tri-wing Y0 screwdriver: This is non-negotiable. The seven case screws on the back of the DS Lite and DSi use this proprietary head shape.
- Phillips #00 and #000 screwdrivers: Used for internal board screws and the four screws holding the top screen assembly.
- Plastic spudger or pry tool: Metal tools can scratch the new shell or short-circuit the motherboard. Plastic is safer.
- Tweezers: Essential for handling tiny springs and lifting ZIF connector latches.
- Replacement Shell Kit: Available on eBay, AliExpress, or specialty sites like RetroSix. Kits usually include the top and bottom housing, battery door, and sometimes buttons. Prices range from $8 for basic generic shells to $35 for high-quality custom colors.
Note: You do not need specialized electronic testing equipment like multimeters for this job. It is purely mechanical. However, an anti-static wrist strap is recommended to protect the mainboard from static discharge.
Step-by-Step Guide: DS Lite Hinge and Shell Replacement
While each model varies slightly, the DS Lite is the most commonly repaired. Follow these steps carefully. Work on a clean, well-lit surface. Keep a container nearby for screws, as they vary in length.
- Power Down and Remove Battery: Turn off the console. Remove the game cartridge and stylus. Slide off the battery cover and take out the battery. Remove the single Phillips screw under the battery compartment.
- Remove Case Screws: Use your Tri-wing Y0 driver to remove the seven screws on the back of the bottom shell. Gently pry the bottom case off. Be careful; the L and R shoulder button springs may pop out. Place them in your screw container immediately.
- Disconnect Lower Board Cables: Locate the Zero Insertion Force (ZIF) connectors on the mainboard. Lift the black latch on each connector *before* pulling the ribbon cable. Pull straight out. Disconnect the Wi-Fi antenna wire, microphone/volume daughterboard, touch-screen ribbon, and lower LCD ribbon.
- Free the Mainboard: Carefully lift the mainboard. You may need to detach the speaker wires if they are soldered or clipped tightly. Set the board aside or fold it gently to access the upper section.
- Access the Top Shell: Open the clamshell fully. Look at the top screen area. There are four small Phillips screws hidden under rubber plugs around the perimeter of the top LCD bezel. Remove these screws.
- Separate the Top Shell: Gently pry apart the top plastic shell from the internal frame containing the LCD, speakers, and Wi-Fi antenna. This requires patience. Use your spudger to release the clips around the edges.
- The Critical Step: Threading the Ribbon: This is where most beginners fail. The upper screen ribbon cable and Wi-Fi antenna must pass through the hinge barrel. In the old shell, the hinge is likely cracked. You must carefully rotate the top half of the internals (LCD + speakers) to thread these cables through the hole in the *new* shell’s hinge barrel. Do not force it. If you feel resistance, stop and adjust the angle. Forcing it tears the cable, resulting in a dead screen.
- Transfer Components: Move the LCD panel, speakers, and light pipes into the new shell. Ensure all plastic pegs align with the holes in the new housing. Check for dust on the screens and blow it away with compressed air.
- Reassemble Top Half: Snap the top shell halves together. Reinstall the four Phillips screws and the rubber covers.
- Final Reassembly: Thread the ribbon and antenna down into the bottom shell. Reconnect all cables to the mainboard (lower screen, touch, Wi-Fi). Re-seat the L/R button springs-a tricky step that often takes several tries. Connect the battery, then snap the bottom case on and secure with the seven Tri-wing screws.
Model-Specific Differences: Original DS, DSi, and DSi XL
If you aren't working on a DS Lite, note these critical differences:
| Model | Hinge Type | Shell Compatibility | Key Difficulty |
|---|---|---|---|
| Original Nintendo DS | Dual symmetrical hinges with metal pins | Incompatible with DS Lite/DSi shells | Thicker ABS plastic; harder to pry apart without cracking |
| Nintendo DS Lite | Slender barrel hinge | Standard aftermarket kits widely available | Right hinge nub cracking; ribbon cable threading |
| Nintendo DSi | Larger, reinforced barrel | Requires specific DSi shell kit | Internal camera and SD card slot add complexity |
| Nintendo DSi XL | Large barrel hinge | Requires specific DSi XL shell kit | Battery removal is more involved; larger form factor |
Cross-model compatibility is virtually non-existent. A DS Lite shell will not fit an original DS, and vice versa. Always verify your model number (printed on the battery compartment label) before ordering parts.
DIY vs. Professional Repair: Which Is Right for You?
Let’s talk money and risk. A DIY repair costs between $15 and $45 initially, including the shell kit and tools. Once you own the tools, subsequent repairs cost only $10-$20 for parts. However, there is a learning curve. First-time users report taking 2 to 4 hours, with a 20-30% chance of minor mishaps like stripped screws or torn speaker wires.
Professional services, such as Retro Revolution or local repair shops, charge $35-$60. They complete the job in 24-72 hours with near-100% success rates. If you have only one console and lack confidence in your manual dexterity, paying a pro is worth the peace of mind. If you plan to restore multiple consoles or enjoy modding (like adding IPS screens), investing in DIY skills pays off quickly.
Common Pitfalls and How to Avoid Them
- Stripped Screws: Ensure your Tri-wing driver fits snugly. Apply downward pressure while turning counter-clockwise. If a screw strips, you may need to extract it with pliers or drill it out.
- Torn Ribbon Cables: Never pull a ribbon cable from a ZIF connector without lifting the latch first. When threading the upper ribbon through the hinge, go slow. If it catches, back up and realign.
- Lost Springs: The L and R shoulder button springs are tiny and fly off easily. Work over a tray or use a magnetic mat. Re-installing them is frustrating; practice on a scrap piece of plastic first.
- Ignoring Dust: Old consoles accumulate dust inside. Before closing the new shell, use compressed air to clear the LCD surfaces and hinge barrels. Dust trapped between the screen and shell looks terrible.
- Skipping the Test: Before installing the final seven case screws, reconnect the battery and power on the device. Test both screens, touch response, volume buttons, Wi-Fi, and audio. If something fails, you haven’t sealed the console yet, so you can fix it easily.
Frequently Asked Questions
Can I replace just the hinge without changing the whole shell?
Technically yes, but it is not recommended. To replace the hinge barrel, you must fully disassemble the console and disconnect all ribbon cables anyway. Since the labor is identical to a full shell swap, and aftermarket shells are inexpensive ($10-$20), replacing the entire shell is more cost-effective and ensures no hidden micro-cracks remain in the old plastic.
Will a DS Lite shell fit on an original Nintendo DS?
No. The original DS, DS Lite, DSi, and DSi XL all have unique dimensions and hinge geometries. Shells are not interchangeable between models. Always buy a shell kit specifically labeled for your exact model.
What is the hardest part of the DS hinge repair?
The most difficult and risky step is threading the upper screen ribbon cable and Wi-Fi antenna through the new hinge barrel. The cable is fragile and can tear if forced or creased sharply. Take your time, rotate the components gently, and ensure the cable lies flat.
Do I need special glue to attach the new shell?
No. The Nintendo DS shells are held together by friction fits, internal plastic pegs, and screws. Glue is not used and should be avoided, as it makes future repairs impossible and can damage the plastic.
Should I lubricate the new hinges?
It is optional. Some modders apply a tiny amount of PTFE or silicone grease to reduce friction, but others argue it attracts dust over time. New aftermarket hinges usually have enough tolerance to work smoothly without lubrication. If you choose to lubricate, use a minimal amount.
Where can I buy high-quality replacement shells?
Budget options are available on eBay and AliExpress for $8-$15. For higher quality with better color accuracy and fit, look at specialty vendors like FunnyPlaying, RetroSix, or Retro Revolution. Premium shells often include improved buttons and membranes.